Road to Productivity: i3wm
Often times, there are periods in my life in which I try to maximize my productivity, not by being productive but by shaping the road that will lead me to that eventual productivity. It is not a bad way to procrastinate, or at least, that’s what I tell myself. One of the ways I do that is by tinkering with my software and/or hardware setup. This post is regarding the former, in specific, my window manager of choice: i3wm.
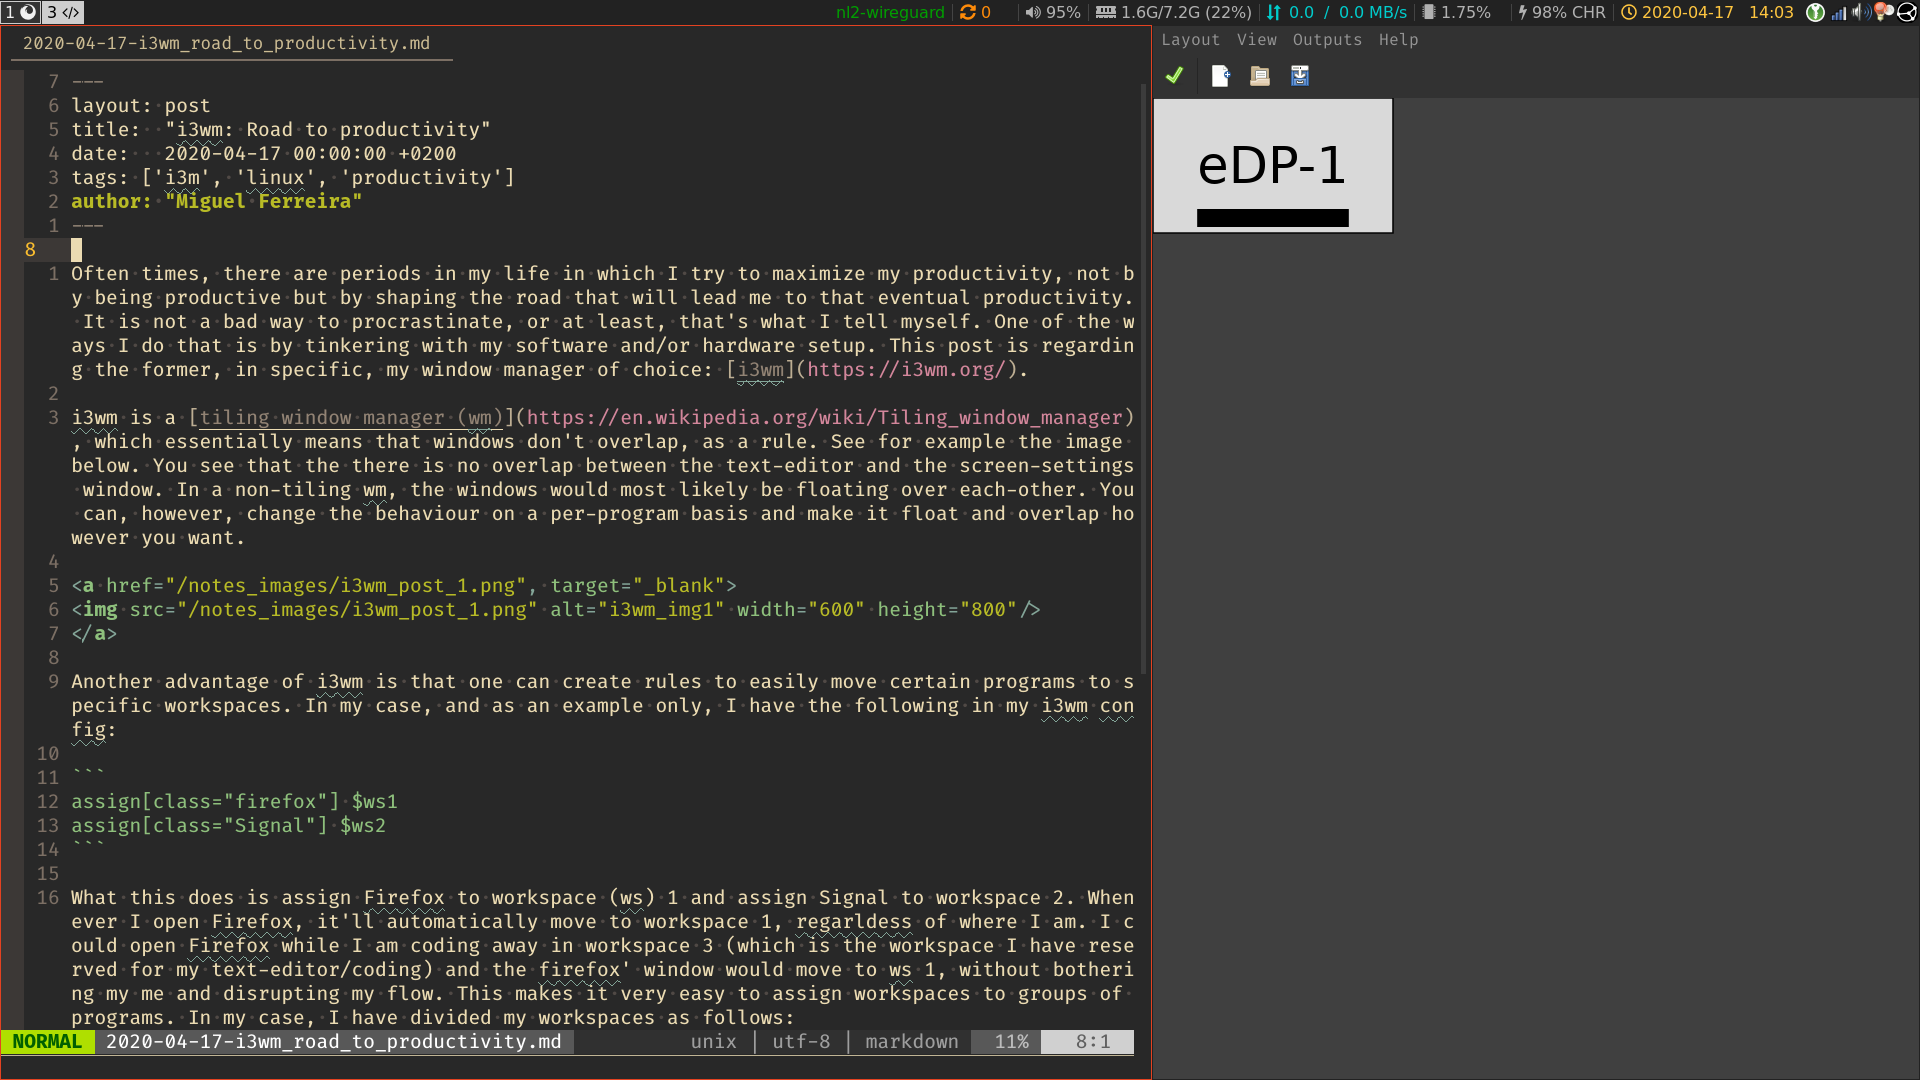
i3wm is a tiling window manager (wm), which essentially means that windows don’t overlap, as a rule. See for example the image below. You can see that there is no overlap between the text-editor and the screen-settings window. In a non-tiling wm, the windows would most likely be floating over each-other. You can, however, change the behaviour on a per-program basis and make it float and overlap however you want.
Another advantage of i3wm is that one can create rules to easily move certain programs to specific workspaces. In my case, and as an example only, I have the following in my i3wm config:
assign[class="firefox"] $ws1
assign[class="Signal"] $ws2
What this does is assign Firefox to workspace (ws) 1 and assign Signal to workspace 2. Whenever I open Firefox, it’ll automatically move to workspace 1, regardless of where I am. I could open Firefox while I am coding away in workspace 3 (which is the workspace I have reserved for my text-editor/coding) and the firefox’ window would move to ws 1, without bothering me and disrupting my flow. This makes it very easy to assign (groups of) programs to certain workspaces. In my case, I have divided my workspaces as follows:
- Workspace 1: Browser;
- Workspace 2: Chat programs (signal, matrix, etc);
- Workspace 3: Coding/text editor (vim, sublime-text);
- Workspace 4: Media (spotify, vlc/mpv);
- Workspace 5: Office (Libreoffice stuff, which I rarely use);
- Workspace 6: Pdf files;
- Workspace 7: Mail (Thunderbird);
- Workspace 8: Not reserved for anything. I can use whenever, it’s a blank canvas;
- Workspace 9: For general “stuff”, such as torrent client, vpn client (if needed), etc;
- Workspace 10: Not reserved for anything. I can use whenever, it’s a blank canvas;
I use both a laptop and a desktop and as such,I need a setup that is congruent on both computers. When I am on the laptop, these workspaces work perfectly with only the laptop’s screen. When I am using the desktop, I have configured the even workspaces (2, 4, etc) to open on monitor 1 and the odd workspaces (1, 3, etc) to open on monitor 2. i3wm makes this very easy.
Each one of these workspaces has a number of programs that are automatically assigned to them.
In my case, I use pretty much all programs in fullscreen. A workspace is, at any time, only occupied by one window and one window only. This makes it easier to focus and get in flow. I could, however, easily organize a workspace however I wanted. I could do 2 windows side by side, or one below the other. I could make 1 use 1/4 of the space while the other uses 1/2, with 1/4 of the space unused. Tiling WM are powerful in that regard.
In i3wm, there is no option to minimize to the bar. You could potentially hide a window, but it is not minimized to the bar, it is hidden. Not having the tradional bar reduces visual clutter and, again, improves focus. It’s all about that minimalism framework! I use the bar solely to view important information regarding my machine as well as an helper for noticing workspaces. In the image below, you’ll notice that I have several “blocks” in the right side of the bar, beginning with “nl2-wireguard” and ending with the clock/time.
- The 1st block gives me information whether or not I am connected to Mullvad. If so, to which server am I connected?;
- The 2nd block gives me the number of updates (Official repositories + AUR) I have available (I use arch btw.);
- The 3rd block gives me the sound volume;
- The 4th block gives me memory information (RAM);
- The 5th block is my bandwidth information;
- The 6th block is my CPU usage;
- The 7th block is charging info;
- The 8th block is date and time;
One can change the order of these blocks and add or remove blocks as one pleases. You can either create your own blocks, as I did for the VPN block!
In the left side of the bar, you’ll notice that I have 4 workspaces opened: 1, 3, 4 and 10. You can rename these workspaces, change their color (both when focused and unfocused), etc. In fact, you can pretty much style the bar however you want. You can probably make it rain fireworks whenever you accomplish a task…
The best of i3wm is still to be mentioned though: Its keyboard friendliness. You open, close, move and resize programs by using keyboard shortcuts. You don’t really need a mouse!
So, to sum it up, i3wm has several advantages over more conventional desktop environments, namely:
- Easily edited to fit your needs and wants;
- Lightweight;
- Beautiful (you can shape it in a way that brings you joy);
- Powerful (you can do many things with it);
- Keyboard centric! (You do everything by using keyboard shortcuts, no need to waste precious time by using the mouse);
As an additional eye candy, here is an image of my setup in a clean state.
And that’s it for now. On a later post I’ll go through some specific scripts and programs that I use in conjunction with i3 to improve my productivity further. One example of that is in this post.

